
Rabikant Singh
Nov 15, 2024
How To Build WebSocket Server In Golang
In this blog we will learn How To Build WebSocket Server In Golang
Robert Griesemer, Rob Pike, and Ken Thompson created the statically typed, compiled programming language Go at Google. Although it has memory safety, garbage collection, structural typing, and parallelism in the CSP manner, it is syntactically identical to C.
Numerous popular Linux apps, including Docker, Kubernetes, and many others, employ Go. Let’s see how can we build a WebSocket server using Go or Golang.
To get started with this tutorial you need to have Go installed in your system.
If you are on Ubuntu, you can follow this easy tutorial: Install Golang on your Ubuntu Linux.
For MacOS, Windows and other Linux systems, download and run the installers from this link: https://go.dev/doc/install
Once you have Golang installed in your machine, we can continue to develop our WebSocket server.
Prepare Working Directory
Create an empty directory to store the source of our Golang websocket server.
mkdir go-websocket
Next, initialize a go modules in this directory by using the following command.
go mod init github.com/piesocket/go-websocket-server
And finally create the main.go file to store the source-code for WebSocket server.
touch main.go
- WebSocket Server Code
We have the working directory ready and now we can begin writing the source code for our websocket server in golang.
Open the directory in your favorite IDE, for example, to open the directory with visual studio code you can use the following command from its parent directory.
code go-websocket
Or, simply open the main.go file in a CLI based text editor, because it is the only file we will edit to build the WebSocket server. Following is a command to open the main.go file in nano text-editor.
nano main.go
Once your text edior/IDE is ready, we can begin by adding a simple “Hello WebSocket” program to main.go
package main
import "fmt"
func main() {
    fmt.Println("Hello WebSocket")
}
Test the code above with following command
go run main.go
If you see “Hello WebSocket” as output, eveyrthing is working great and we are ready to move on to the next step.
Create HTTP server
Add the following code to main.go to create a basic HTTP server, which we will later upgrade to a WebSocket server
package main
import (
    "fmt"
    "log"
    "net/http"
)
func homePage(w http.ResponseWriter, r *http.Request) {
    fmt.Fprintf(w, "Home HTTP")
}
func wsEndpoint(w http.ResponseWriter, r *http.Request) {
    fmt.Fprintf(w, "Hello WebSocket")
}
func setupRoutes() {
    http.HandleFunc("/", homePage)
    http.HandleFunc("/ws", wsEndpoint)
}
func main() {
    fmt.Println("Hello World")
    setupRoutes()
    log.Fatal(http.ListenAndServe(":8080", nil))
}
If you run your code now using the following command
go run main.go
You can visit http://localhost:8080 and http://localhost:8080/ws to see two HTTP different endpoints.
We will further modify the code for /ws endpoint to make this a WebSocket server.
Install gorilla/websocket
gorrila/websocket is a golang module that makes it easy to build WebSocket servers with its in-built utilities. Use the following command to add this module into your project directory.
go get github.com/gorilla/websocket
Upgrade HTTP to WS
Let’s upgrade the HTTP endpoint on /ws to become a WebSocket endopoint.
Import github.com/gorilla/websocket in main.go as following
import (
"fmt"
"log"
"net/http"
"github.com/gorilla/websocket"
)
Create a connection upgrader in next lines
var upgrader = websocket.Upgrader{
ReadBufferSize:  1024,
WriteBufferSize: 1024,
CheckOrigin:     func(r *http.Request) bool { return true },
}
Then, in the next few lines, create a reader function
func reader(conn *websocket.Conn) {
for {
// read in a message
messageType, p, err := conn.ReadMessage()
if err != nil {
log.Println(err)
return
}
// print out that message for clarity
log.Println(string(p))
if err := conn.WriteMessage(messageType, p); err != nil {
log.Println(err)
return
}
}
}
And finally update the wsEnpoint function to use the reader and upgrader
func wsEndpoint(w http.ResponseWriter, r *http.Request) {
// upgrade this connection to a WebSocket
// connection
ws, err := upgrader.Upgrade(w, r, nil)
if err != nil {
log.Println(err)
}
log.Println("Client Connected")
err = ws.WriteMessage(1, []byte("Hi Client!"))
if err != nil {
log.Println(err)
}
// listen indefinitely for new messages coming
// through on our WebSocket connection
reader(ws)
}
Complete main.go source code
Your main.go file should look like the following:
package main
import (
"fmt"
"log"
"net/http"
"github.com/gorilla/websocket"
)
var upgrader = websocket.Upgrader{
ReadBufferSize:  1024,
WriteBufferSize: 1024,
CheckOrigin:     func(r *http.Request) bool { return true },
}
func reader(conn *websocket.Conn) {
for {
// read in a message
messageType, p, err := conn.ReadMessage()
if err != nil {
log.Println(err)
return
}
// print out that message for clarity
log.Println(string(p))
if err := conn.WriteMessage(messageType, p); err != nil {
log.Println(err)
return
}
}
}
func homePage(w http.ResponseWriter, r *http.Request) {
fmt.Fprintf(w, "Home Page")
}
func wsEndpoint(w http.ResponseWriter, r *http.Request) {
// upgrade this connection to a WebSocket
ws, err := upgrader.Upgrade(w, r, nil)
if err != nil {
log.Println(err)
}
log.Println("Client Connected")
err = ws.WriteMessage(1, []byte("Hi Client!"))
if err != nil {
log.Println(err)
}
reader(ws)
}
func setupRoutes() {
http.HandleFunc("/", homePage)
http.HandleFunc("/ws", wsEndpoint)
}
func main() {
fmt.Println("Hello World")
setupRoutes()
log.Fatal(http.ListenAndServe(":8080", nil))
}
- Test Golang WebSocket Server
Once you have completed the main.go file, run it using following command
go run main.go
This should print “Hello World” in your terminal, let this terminal stay open.
Install PieSocket’s Websocket tester extension.
Once you have installed the extension above in your brower, open it using the icon in extensions tab at the right hand side of your Google chrome URL bar.
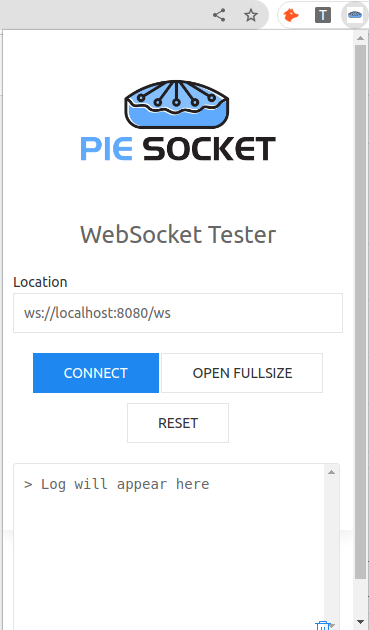 PieSocket WebSocket Client
Enter ws://localhost:8080/ws in the WebSocket URL input box as shown above and click on connect.

PieSocket WebSocket Client: Connected State
You can now send and recieve messages from your WebSocket server using this client.
You can use your WebSocket server to build Chatrooms and other realtime applications. Here is an example of how to Build a chatroom using the WebSocket server, there will be some modifications needed in the server you just created to build it chat-compatible.
You will see following logs in your terminal when clients use the WebSocket server.
 WebSocket Server Stdout
Introducing PieSocket’s Managed WebSocket Clusters.
WebSockets are easy to build but difficult to scale, If you are building an applications which requires high-availability of WebSocket servers which can scale along with your application’s traffic, you should consider using PieSocket’s managed WebSocket clusters.
Outsourcing your WebSocket headaches to PieSocket is not only cheaper than building a scalable in-house solution, it is also tried and tested on large workloads for reliablity and speed.
PieSocket WebSocket URL looks like following:
wss://CLUSTER_ID.piesocket.com/v3/CHANNEL_ID?api_key=API_KEY
You can generate your CLUSTER_ID and API_KEY in few clicks for free from here: https://www.piesocket.com/pricing
Learn more about PieSocket’s WebSocket API
Hope this helps in your WebSocket journey, feel free to comment for queries and feedbacks.