
Rabikant Singh
Nov 22, 2024
How To Make A Polling System In Vue Using WebSocket
Let's learn how to make a voting system in vue with WebSocket (PieSocket)
In this blog, we will build a real-time polling application using Vue 3 and PieSocket. The app will allow users to vote on their favorite programming language, and all connected users will see the results update live. This project is beginner-friendly but dives deep enough for advanced users to appreciate how real-time updates can enhance their applications.
Overview
The application will:
- Display a poll question and options.
- Allow users to vote for an option.
- Broadcast votes to other connected users using PieSocket, enabling real-time updates.
We’ll break this blog into the following sections:
- Project Setup
- Understanding the Template
- Adding Functionality with Vue
- Implementing Real-Time Features with PieSocket
- Styling the Application
- Enhancements and Final Thoughts
Setting Up the Project
First, set up a Vue 3 project. If you haven’t installed Vue yet, you can do so by running:
npm init vue@latest
After setting up the project, navigate to the folder:
cd your-project-name
npm install
npm run dev
You now have a Vue 3 project running locally. Let’s start building the polling app.
Building the Template
The template is where the structure of your app is defined. Here’s the code:
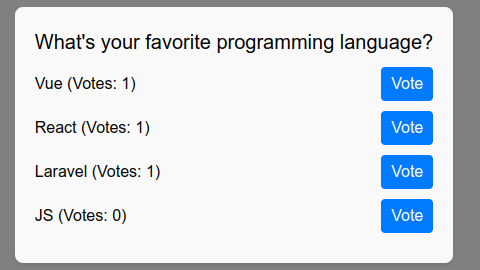
<template>
  <div class="poll-container">
    <h2 class="poll-question">{{ question }}</h2>
    <ul class="poll-options">
      <li v-for="option in options" :key="option.value" class="poll-option">
        {{ option.text }} (Votes: {{ option.votes }})
        <button @click="vote(option)" class="vote-button">Vote</button>
      </li>
    </ul>
  </div>
</template>
Explanation:
- Poll Question: Displays the poll's question using Vue's {{ question }} syntax.
- Options List:
- The v-for directive dynamically generates a list of options from the options array.
- Each option includes:
- The option's name (option.text).
- The current vote count (option.votes).
- A "Vote" button that triggers the vote(option) function.
Adding Functionality with Vue
Now, let’s add interactivity to our app using Vue’s reactive variables.
Defining the State
We’ll manage the poll question and options using Vue’s ref:
<script setup>
import { ref } from 'vue';

const question = ref("What's your favorite programming language?");
const options = ref([
  { value: 1, text: 'Vue', votes: 0 },
  { value: 2, text: 'React', votes: 0 },
  { value: 3, text: 'Laravel', votes: 0 },
  { value: 4, text: 'JS', votes: 0 },
]);
</script>
- question: Holds the poll question.
- options: An array of objects, where each object represents a poll option:
- value: A unique ID for the option.
- text: The option's name.
- votes: The current vote count (initialized to 0).
Handling Votes
The vote(option) function is triggered when a user clicks the "Vote" button:
const vote = (option) => {
  option.votes++; // Increment vote count locally
  broadcastVote(option); // Share the vote with other clients
};
- Increment the Vote Count: The function increases the votes count for the selected option.
- Broadcast Votes: Calls broadcastVote, a function we’ll define shortly, to share the vote with connected users in real time.
Adding Real-Time Features with PieSocket
What is PieSocket?
PieSocket is a WebSocket-based service that enables real-time communication between clients. In this app, PieSocket will:
- Listen for votes from other users.
- Broadcast votes to all connected clients.
Integrating PieSocket
Here’s how we set up and use PieSocket in our app:
import PieSocket from "piesocket-js";

let broadcastVote; // Will hold the function to broadcast votes

const pieSocket = new PieSocket({
  clusterId: "s12117.nyc1",
  apiKey: "0jlifmULE2eJFtCI2kjabsR7EdgaY4EWRZgdGMkE", // Replace with your API key
});

pieSocket.subscribe("vote-room").then(channel => {
  // Listen for incoming votes
  channel.listen("vote", (data) => {
    const { value } = JSON.parse(data); // Parse the received vote data
    options.value.find(option => option.value === value).votes++; // Update the corresponding option
  });

  // Define the broadcast function
  broadcastVote = (option) => {
    channel.publish("vote", JSON.stringify({ value: option.value })); // Send vote data to other clients
  };
}).catch(error => {
  console.error("Error subscribing to PieSocket channel:", error);
});
Explanation:
- Setting Up PieSocket:
- We create a PieSocket instance with a clusterId and apiKey.
- Replace the apiKey with your key from the PieSocket dashboard.
- Subscribing to a Channel:
- The app subscribes to the vote-room channel.
- This is the channel where votes are broadcasted and received.
- Listening for Events:
- The channel.listen method listens for "vote" events.
- When an event is received, the app:
- Parses the data (value).
- Updates the votes count for the relevant option.
- Broadcasting Votes:
- The broadcastVote function sends the selected option’s ID (value) to the channel.
- This ensures all connected clients are updated.
Styling the App
Here’s the CSS for our app:
<style scoped>
.poll-container {
  font-family: Arial, sans-serif;
  background-color: #f9f9f9;
  padding: 20px;
  border-radius: 8px;
  box-shadow: 0 2px 4px rgba(0, 0, 0, 0.1);
}

.poll-question {
  font-size: 20px;
  margin-bottom: 10px;
  color: black;
}

.poll-options {
  list-style: none;
  padding: 0;
}

.poll-option {
  display: flex;
  align-items: center;
  justify-content: space-between;
  margin-bottom: 10px;
}

.vote-button {
  background-color: #007bff;
  color: white;
  border: none;
  padding: 5px 10px;
  border-radius: 4px;
  cursor: pointer;
  transition: background-color 0.2s;
}

.vote-button:hover {
  background-color: #0056b3;
}
</style>
Key Points:
- The poll container has a clean and modern design with rounded corners and shadows.
- Vote buttons are styled with a blue background and a hover effect for better interactivity.
Running the App
Run this command in terminal:
npm run dev
- Open the app in multiple browser windows or devices.
- Vote on one window and watch as the results update live across all instances.
Enhancements
This app is a great starting point, but here are some enhancements you can consider:
- Authentication:
- Add user login to prevent multiple votes from the same user.
- Data Persistence:
- Save votes in a database for analysis and historical tracking.
- UI Improvements:
- Use animations to make the voting process more engaging.
- Mobile Responsiveness:
- Ensure the app works seamlessly on all screen sizes.
Complete Code
The project is available on our GitHub :