
Rabikant
Dec 24, 2024
How to make a chat app in Android with WebSocket
In this blog we will learn how to use Websocket to build a chat app for Android
Before proceeding, there are a couple of prerequisites that you need to familiarize yourself with:
Jetpack Compose: This is an up-to-date library for creating Android UI native to the platform. With Jetpack Compose, Android UI development is made easier, faster with less code, and comes with tools and Kotlin APIs advantages.
Kotlin: It is the modern statically typed programming language, . It is engaging, to the point, and strong. Moreover, it is fully compatible with Java which would allow any Android libraries to be used in any Kotlin application.
What is Jetpack compose?
Jetpack Compose is a contemporary and revolutionary system exclusively intended to build the native Android User Interfaces (UI). Originally It offered a structured way of developing Android UIs and saves a considerable amount of code to write to produce responsive User Interfaces. This is mainly owed to its strong set of tools and on the basis of the Kotlin language, the API functions the tool offers. These features combine to help reduce the actual process of Android UI development by a great deal, the production cycle is shortened and the chances of the developers’ visions being realised is increased greatly.
What is WebSocket?
WebSocket is a sophisticated communication protocol of a computer. It is built for bidirectional full-duplex channels for a single TCP connection. This means that it is possible to send as well as receive data through the same link without the need for a particular link for both the directions. This innovative piece enables transfer of data in real time – an element that is a major requirement in today’s world that is fast embracing digital components. It can transfer data from a client to a server, and from a server to a client, within the blink of any eye, with no considerable amount of time eaten up in the process. This explains why WebSocket is highly relevant for any applicarion that needs prompt response, includng the discussed chat app. WebSocket hence made it easier for end users using the CHAT APP to send and receive messages in real-time consequently give them the ever-active sense of the application.
Creating our project
1. Start Android Studio
Open Android Studio on your computer.
2. Create a new project
Click on File, then New and then New Project....
3. Select a Project Template
In the Create New Project window, select Empty Activity and click Next.
4. Configure your project
Enter your Application name. Enter your Company Domain. This will be used to create your package name. Select your Project location. Select your Language in my case I am using Kotlin. Select the Minimum SDK for your app. This is the lowest version of Android that your app will run on.
Now that your app is ready, let's write the code for our app.
Add these dependencies in build.gradle.kts (Module :app)
implementation ("com.piesocket:channels-sdk:1.0.5")
implementation ("com.google.android.material:material:1.5.0")
Then change minSDK to 27 in gradle.build.kts(Module).
defaultConfig {
        applicationId = "YOUR PACKAGE NAME"
        minSdk = 27
        targetSdk = 34
        versionCode = 1
        versionName = "1.0"

        [...]
    }
Now add this in AndroidManifest.xml in application tag:
tools:replace="android:theme"
Also add this above application tag:
<uses-permission android:name="android.permission.INTERNET"/>
Let's create an account in Piehost.com.
After creating the account, create a cluster and go to “API Keys” tab and copy “Cluster ID” and “API Key”
        val pieSocket = remember {
            val pieSocketOptions = PieSocketOptions()
            pieSocketOptions.clusterId = "Your Cluster Id"
            pieSocketOptions.apiKey = "Your API Key"
            PieSocket(pieSocketOptions)
        }
The code snippet provided is responsible for setting up PieSocket, a crucial part of our application infrastructure that enables real-time communication.
In this code, we first declare a variable pieSocket and use a remember block to store it. Inside this block, we create an instance of PieSocketOptions(), which is a class that holds configuration information for our PieSocket instance.
Next, we set the clusterId for the PieSocket options. This id, "API_Key" in this case, is used to determine which server cluster we are connecting to.
Following this, we input the apiKey. This key, "Cluster_Id", is essential as it authenticates our application to use the PieSocket service.
Finally, we pass these options into our PieSocket instance. This completes the setup process, leaving us with a fully configured PieSocket instance ready to support real-time communication in our application.
val channel = remember(pieSocket) {
    pieSocket.join("chat-room")
}
You can observe the connection process to a PieSocket channel. Here, the name of the channel is "chat-room". Simply put, the remember(pieSocket) function is being used to create a reference to the pieSocket instance. Following this, the join method is invoked on the pieSocket instance within the remember block, with the argument "chat-room". This action effectively establishes a connection to the PieSocket channel with the specified name, "chat-room".
DisposableEffect(channel) {
        channel.listen("system:connected", object : PieSocketEventListener() {
            override fun handleEvent(event: PieSocketEvent) {
            }
        })

        channel.listen( "message", object : PieSocketEventListener() {
            override fun handleEvent(event: PieSocketEvent) {
                coroutineScope.launch {
                    messages.add(Message(event.data.toString(), false))
                }
                Log.i("TextReceived", event.data.toString())
            }
        })

        onDispose {
            channel.disconnect()
        }
    }
- DisposableEffect(channel) { ... }: This sets up a side effect related to the channel object. The code inside will run when the channel object changes or when the composable is first added to the UI.
- channel.listen("system:connected", ...): This sets up a listener for a “system:connected” event on the PieSocket channel, which is triggered when the channel successfully connects. The handleEvent function is empty, indicating no specific action on this event for now.
- channel.listen("message", ...): This sets up a listener for “message” events on the PieSocket channel. When a message event occurs, it adds a new Message object to the messages list with the content from the event data and marks it as not sent by me (false). It also logs the received text.
- coroutineScope.launch { ... }: This launches a coroutine within the scope of the composable. It’s necessary because modifying state in Compose (like adding a message to a list) should be done in a coroutine.
- onDispose { ... }: This is the cleanup function that will be called when the composable is removed from the UI or if the channel object changes. It disconnects from the PieSocket channel.
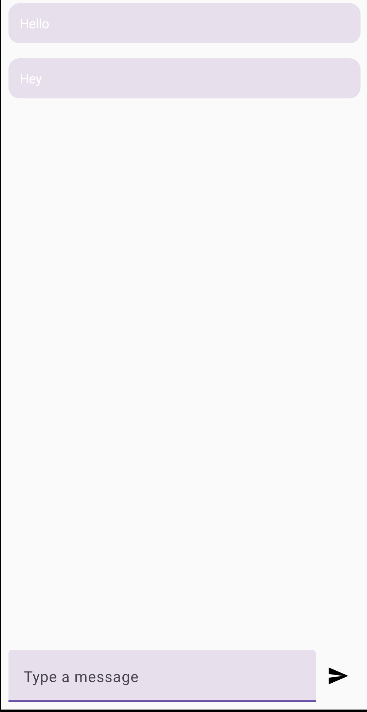
 Column(modifier = Modifier.fillMaxSize()) {
        LazyColumn(
            modifier = Modifier.weight(1f),
            reverseLayout = true,
            verticalArrangement = Arrangement.spacedBy(8.dp)
        ) {
            items(messages.reversed()) { message ->
                MessageCard(message)
            }
        }
        Row(
            modifier = Modifier
                .padding(8.dp)
                .fillMaxWidth(),
            verticalAlignment = Alignment.CenterVertically
        ) {
            TextField(
                value = textState,
                onValueChange = { textState = it },
                modifier = Modifier.weight(1f),
                placeholder = { Text("Type a message") },
                keyboardOptions = KeyboardOptions.Default.copy(imeAction = ImeAction.Send),
            )
            IconButton(onClick = {
                if (textState.isNotBlank()) {
                    // Publish the message to the PieSocket channel
                    val clientEvent = PieSocketEvent("message")
                    clientEvent.setData(textState)
                    channel.publish(clientEvent)
                    // Add the message to the local list and clear the input field
                    messages.add(Message(textState, true))
                    textState = ""
                }
            }) {
                Icon(imageVector = Icons.Default.Send, contentDescription = "Send")
            }
        }
    }
explain
- Column(modifier = Modifier.fillMaxSize()): This creates a column layout that fills the maximum size of its parent container.
- LazyColumn(...): This is a vertically scrolling list that only composes and lays out the currently visible items. It’s used here to display chat messages. The reverseLayout = true property makes the list start from the bottom, which is common in chat interfaces.
- items(messages.reversed()) { message -> ... }: This defines the items in the LazyColumn. The messages are reversed so that the newest message is at the bottom, following typical chat UI conventions.
- MessageCard(message): This is likely a custom composable function that takes a message and displays it in the UI as a card.
- Row(...): This creates a horizontal layout for the message input field and send button.
- TextField(...): This is an input field where users can type their messages. The keyboardOptions property is set to show a ‘Send’ button on the keyboard.
- IconButton(...): This button is used to send the message. When clicked, it checks if the text field is not blank, publishes the message to a channel (probably using PieSocket, which is a real-time messaging service), adds the message to a local list, and clears the text field.
- Icon(...): This defines the icon displayed inside the IconButton, which in this case is a ‘Send’ icon.
fun MessageCard(message: Message) {
val textColor = if (message.isSentByMe) MaterialTheme.colorScheme.onPrimary else MaterialThfun MessageCard(message: Message) {
val textColor = if (message.isSentByMe) MaterialTheme.colorScheme.onPrimary else MaterialTheme.colorScheme.onSurfaceeme.colorScheme.onSurface
Card(
    modifier = Modifier
        .fillMaxWidth()
        .padding(horizontal = 8.dp, vertical = 4.dp)

) {
    Row(
        modifier = Modifier.padding(all = 12.dp), // Increased padding for a better look
        verticalAlignment = Alignment.CenterVertically
    ) {

        Text(
            text = message.content,
            color = textColor,
            modifier = Modifier.weight(1f) // Text takes up the remaining space
        )

    }
  }

}
- val textColor = ...: This line determines the color of the text based on who sent the message. If message.isSentByMe is true, it uses the onPrimary color from the theme; otherwise, it uses the onSurface color.
- Card(...): This creates a card UI element that will contain the message text. The card fills the maximum width available and has horizontal and vertical padding.
- Row(...): Inside the card, there’s a row layout with padding, which aligns its children vertically at the center.
- Text(...): This is the actual message content displayed inside the row. The text color is set based on the earlier textColor variable, and it takes up all available space due to Modifier.weight(1f).
Change MainActivity.kt like this:
package "YOUR PACKAGE NAME"

import android.os.Bundle
import androidx.activity.ComponentActivity
import androidx.activity.compose.setContent

class MainActivity : ComponentActivity() {
    override fun onCreate(savedInstanceState: Bundle?) {
        super.onCreate(savedInstanceState)
        setContent {
            ChatScreen()
        }
    }
}
Here, I am presenting the comprehensive code snippet you can paste this in ChatScreen.kt
package "YOUR PACKAGE NAME"


import kotlinx.coroutines.launch
import android.annotation.SuppressLint
import android.util.Log
import androidx.compose.foundation.layout.*
import androidx.compose.foundation.lazy.LazyColumn
import androidx.compose.foundation.lazy.items
import androidx.compose.foundation.text.KeyboardOptions
import androidx.compose.material.icons.Icons
import androidx.compose.material.icons.filled.Send
import androidx.compose.material3.*
import androidx.compose.runtime.*
import androidx.compose.ui.Alignment
import androidx.compose.ui.Modifier
import androidx.compose.ui.text.input.ImeAction
import androidx.compose.ui.unit.dp
import com.piesocket.channels.PieSocket
import com.piesocket.channels.misc.PieSocketEvent
import com.piesocket.channels.misc.PieSocketEventListener
import com.piesocket.channels.misc.PieSocketOptions
import org.json.JSONObject
import java.util.*

data class Message(val id: String, val content: String, val isSentByMe: Boolean)

@SuppressLint("RememberReturnType")
@Composable
fun ChatScreen() {
    var textState by remember { mutableStateOf("") }
    val messages = remember { mutableStateListOf<Message>() }
    val coroutineScope = rememberCoroutineScope()

    // Initialize PieSocket with the provided options
    val pieSocket = remember {
        val pieSocketOptions = PieSocketOptions()
        pieSocketOptions.clusterId = "free.blr2"
        pieSocketOptions.apiKey = "2ZilnOus6sDs7od7bbVYQgx8LlgAfabf7yGLJlUt"
        PieSocket(pieSocketOptions)
    }

    // Join the "chat-room" channel
    val channel = remember(pieSocket) {
        pieSocket.join("chat-room")
    }

    // Listen for incoming messages and system connection events
    DisposableEffect(channel) {
        channel.listen("system:connected", object : PieSocketEventListener() {
            override fun handleEvent(event: PieSocketEvent) {
                // Handle system connected event if needed
            }
        })

        channel.listen("message", object : PieSocketEventListener() {
            override fun handleEvent(event: PieSocketEvent) {
                coroutineScope.launch {
                    val eventData = event.data.toString()
                    val jsonObject = JSONObject(eventData)
                    val receivedMessageId = jsonObject.getString("id")
                    val receivedMessageContent = jsonObject.getString("content")
                    if (!messages.any { it.id == receivedMessageId }) {
                        messages.add(0, Message(receivedMessageId, receivedMessageContent, false))
                    }
                }
                Log.i("TextReceived", event.data.toString())
            }
        })

        onDispose {
            channel.disconnect()
        }
    }

    Column(modifier = Modifier.fillMaxSize()) {
        LazyColumn(
            modifier = Modifier.weight(1f),
            reverseLayout = true,
            verticalArrangement = Arrangement.spacedBy(8.dp)
        ) {
            items(messages) { message ->
                MessageCard(message)
            }
        }
        Row(
            modifier = Modifier
                .padding(8.dp)
                .fillMaxWidth(),
            verticalAlignment = Alignment.CenterVertically
        ) {
            TextField(
                value = textState,
                onValueChange = { textState = it },
                modifier = Modifier.weight(1f),
                placeholder = { Text("Type a message") },
                keyboardOptions = KeyboardOptions.Default.copy(imeAction = ImeAction.Send),
            )
            IconButton(onClick = {
                if (textState.isNotBlank()) {
                    // Publish the message to the PieSocket channel with a unique ID
                    val messageId = UUID.randomUUID().toString()
                    val messageContent = textState
                    val messageJson = JSONObject().apply {
                        put("id", messageId)
                        put("content", messageContent)
                    }.toString()

                    val clientEvent = PieSocketEvent("message")
                    clientEvent.setData(messageJson)
                    channel.publish(clientEvent)
                    // Add the message to the local list and clear the input field
                    val newMessage = Message(messageId, messageContent, true)
                    messages.add(0, newMessage)
                    textState = ""
                }
            }) {
                Icon(imageVector = Icons.Default.Send, contentDescription = "Send")
            }
        }
    }
}

@Composable
fun MessageCard(message: Message) {
    val textColor = if (message.isSentByMe) MaterialTheme.colorScheme.onPrimary else MaterialTheme.colorScheme.onSurface

    Card(
        modifier = Modifier
            .fillMaxWidth()
            .padding(horizontal = 8.dp, vertical = 4.dp)
    ) {
        Row(
            modifier = Modifier.padding(all = 12.dp), // Increased padding for a better look
            verticalAlignment = Alignment.CenterVertically
        ) {
            Text(
                text = message.content,
                color = textColor,
                modifier = Modifier.weight(1f) // Text takes up the remaining space
            )
        }
    }
}
This Kotlin code is designed for a chat screen. It starts by defining a Texts data class with an author and a body. The ChatScreen function contains a Column with a PieSocket instance that connects to a specific chat room. It also listens for system connections and messages, updating the messages variable with new messages as they come in. The UI elements include a Card for displaying each message and a Button for sending new messages. The color and sizing details for these elements are also specified within the code.
Complete Code
The project is available on our GitHub : https://github.com/piehostHQ/android-chat-app