
Rabikant
Feb 26, 2026
How To Build A WebSocket Chatroom In React
Lets learn how to make chat app in react with websocket
Create The React App
We need to create a React app with:
npx create-react-app my-app
Then cd into the app:
cd my-app
Now create an account on piehost.com after that you will be able to create a cluster there and get your API key and cluster Id.
Let’s install PieSocket in our app.
npm i piesocket-js@5
We also need UUID dependency:
npm i uuid
Importing dependencies
import PieSocket from 'piesocket-js';
import { useState, useEffect } from 'react';
import { v4 as uuidv4 } from 'uuid';
1. Importing Piesocket
This line joins or imports the PieSocket class from the piesocket-js package. PieSocket is a JavaScript library for real-time communication capabilities including WebSockets, WebRTC, and many others. It enables developers to create high-performing and highly sustainable real-time applications.
This seems to be a specific case of using PieSocket and this could be to connect to a PieSocket server for bi-directional communication between the client and server.
2. Importing useState and useEffect
This line imports two hooks from the react package:
useState: Thus, it is a hook that lets you add a state to functional components. It returns an array containing the current state value and a function that can be used to update it.
useEffect: a feature that lets you run some side effects (for example, an API call, setting up a listener) after rendering a component. It takes two arguments: a function to be ran, and an array of dependencies it requires.
These hooks are basic to creating engaging and lively interfaces in React applications.
3. Importing UUID
This line assigns the v4 function from the UUID package to this line, in case for generating unique identifiers (UIDs). The v4 function generates a UUID version again an IPv6 address UUID’s and the most commonly used UUID’s its a 128 bit UUID.
In this specific case, function uuidv4 is presumably utilized to create a unique identifier for each user or message in the chat application.
Thus, by importing these three modules, the code prepares the base for the real-time chat application by setting up WebSockets for messaging, using React hooks to manage state and external effects, and employing UUIDs for creating a unique identification of web pages.
Defining state variables
function App() {
  const [inputValue, setInputValue] = useState('');
  const [displayValue, setDisplayValue] = useState([]);
  const [channel, setChannel] = useState(null);
  const [username, setUsername] = useState(`User_${uuidv4().slice(0, 8)}`);
We define four state variables using the useState hook:
inputValue: blank string to get the input from the user.\
displayValue: an empty string on which it displayed the received messages.
channel: initialized as null, this will hold the reference to the PieSocket channel.
username: this will be used to give users their names.
Setting up PieSocket channel
useEffect(() => {
    const pieSocket = new PieSocket({
      clusterId: "Your Clouster ID",
      apiKey: "Your api key",
      notifySelf: true
    });
    pieSocket.subscribe("chat-room").then((channel) => {
      console.log("Channel is ready")
      setChannel(channel);
      channel.listen("new_message", (data, meta) => {
        console.log("New message: ", data);
        const message = {
          text: data.message,
          sender: data.sender,
          isSelf: data.sender === username
        };
        setDisplayValue((prevDisplayValue) => [...prevDisplayValue, message]);
      });
    });
  }, []);
This useEffect hook is responsible for establishing a real-time connection between the React application and a PieSocket server. Its purpose is to connect to the server, subscribe to a specific chat room, listen for new incoming messages, and update the user interface whenever a new message arrives.
In simple terms, this effect enables live chat functionality inside the component.
Understanding the useEffect Hook
The useEffect hook in React is used to perform side effects inside functional components. Side effects are operations that interact with systems outside of React’s rendering process. Examples include:
- Connecting to APIs
- Opening WebSocket connections
- Subscribing to events
- Setting up timers
The hook takes two arguments:
- A function that contains the logic to execute.
- A dependency array that controls when the function runs.
In this case, the dependency array is empty. That means the effect runs only once — when the component first mounts. It does not run again when the component re-renders.
This behavior is important for WebSocket connections because we typically want to establish the connection only once, not every time the component updates.
Creating a PieSocket Instance
Inside the effect, a new PieSocket client instance is created.
Three configuration options are provided:
- clusterId: Identifies which PieSocket cluster the application connects to. This ensures the connection is routed correctly within PieSocket’s infrastructure.
- apiKey: Used for authentication. It verifies that the application has permission to connect to the cluster.
- notifySelf: A boolean value that determines whether a user receives their own messages. When set to true, the sender also receives the message they just sent. When set to false, they do not.
This setup initializes the real-time connection settings for the application.
Subscribing to a Chat Room
After creating the PieSocket instance, the application subscribes to a channel named “chat-room.”
Channels function like rooms where users can send and receive messages. When the subscription is successful, a channel object is returned. This channel object represents the active connection to that specific chat room.
The channel is then stored in component state. Saving it allows the application to use the same channel later for sending messages or performing other actions.
Listening for New Messages
Once the subscription succeeds, a listener is attached to the channel. This listener waits for an event called “new_message.”
Whenever a new message is published to that channel, the listener’s callback function automatically runs. This is what enables real-time updates — the component does not need to refresh or poll the server. Messages are pushed instantly.
Understanding the Callback Function
The callback function receives two arguments:
- data: Contains the actual message content, including details such as the message text and the sender’s identity.
- meta: Contains metadata about the message, such as delivery information or internal system details.
The primary focus is usually on the data object because it contains the information needed to display the message in the user interface.
Creating a Message Object for the UI
Inside the listener, a new message object is created. This object is structured specifically for the component’s display needs.
It contains:
- The message text
- The sender’s name
- A boolean value indicating whether the message was sent by the current user
The boolean comparison is useful for UI styling. For example, messages sent by the current user may appear aligned to the right, while messages from others appear on the left.
This separation helps create a proper chat interface experience.
Updating the Component State
After creating the message object, the component’s state is updated to include the new message.
The previous messages are preserved, and the new message is appended to the list. When the state updates, React automatically re-renders the component. As a result, the new message appears instantly in the UI.
This state-driven rendering is what makes the chat feel live and responsive.
Why the Dependency Array Is Empty
The dependency array at the end of the useEffect hook is empty. This ensures the effect runs only once — when the component mounts.
If dependencies were included, the effect would re-run whenever those dependencies changed. That could create multiple connections or duplicate listeners, which would cause unexpected behavior in a real-time chat application.
Keeping the dependency array empty prevents repeated connections and ensures a clean, stable setup.
Summary
This useEffect hook performs the following tasks:
- Initializes a connection to the PieSocket server.
- Subscribes to a chat room channel.
- Registers a listener for incoming messages.
- Updates the component’s state whenever a new message arrives.
- Runs only once when the component mounts.
Handling send message
 const handleSendMessage = () => {
    if (!channel) return;
    channel.publish("new_message", {
      message: inputValue,
      sender: username
    });
    setInputValue('');
  };
The handleSendMessage function is responsible for sending a message from the user to the chat room through PieSocket. It performs four main tasks:
- Defines a function that runs when a message is sent
- Ensures the chat channel exists
- Publishes the message to the server
- Clears the input field afterward
In simple terms, this function handles the process of sending a chat message.
- Defining the Function
The line that declares handleSendMessage creates a constant function using arrow function syntax.
This means:
- The function cannot be reassigned because it is declared with const.
- It is written using modern JavaScript arrow function syntax.
- It can be attached to a button click or form submission event.
Whenever the user clicks “Send” (or triggers this function), this logic runs.
- Checking if the Channel Exists
Before sending a message, the function checks whether the channel variable exists.
If the channel is falsy (for example, null or undefined), the function immediately exits.
This is a safety check.
Why is this important?
Because if the WebSocket connection hasn’t finished establishing, or if the user tries to send a message before subscribing to the channel, attempting to publish would cause an error.
This guard prevents the application from crashing or behaving unexpectedly.
It’s a simple but important defensive programming practice.
- Publishing the Message
If the channel exists, the function proceeds to send the message.
The publish method is called on the channel. This method sends an event to the PieSocket server.
Two things are provided:
Event Name
The string "new_message" represents the event type.
Think of this like a topic or category. Any client that is listening for "new_message" events on this channel will receive the data.
Message Data
An object is sent along with the event. This object contains:
- message: The actual text typed by the user, taken from the inputValue state variable.
- sender: The username of the current user, taken from the username state variable.
When this method runs:
- The message is sent to the PieSocket server.
- The server relays the message to all connected clients subscribed to the same channel.
- Each client’s listener (set up in useEffect) receives the message in real time.
This is how real-time chat synchronization works.
- Clearing the Input Field
After publishing the message, the function resets the inputValue state to an empty string.
This clears the input field in the UI.
Why do this?
Because once the message is sent, the text box should be ready for the next message. Without clearing it, the previous message would still appear in the input field.
Since the input field is controlled by React state, updating the state automatically updates what the user sees.
Overall Flow
Here’s what happens step by step when the user sends a message:
- The function runs.
- It checks whether the channel connection exists.
- If the channel is valid, it publishes a "new_message" event.
- The message and sender details are sent to the server.
- The input field is cleared.
- All connected clients (including possibly the sender) receive the message through their listeners.
Summary
The handleSendMessage function:
- Ensures a valid channel connection exists.
- Sends a new message event containing the message text and sender name.
- Relies on PieSocket to broadcast the message to all subscribers.
- Clears the input field after sending.
Together with the useEffect listener setup, this function completes the full real-time chat cycle: sending messages and receiving them instantly across all connected users.
Rendering the UI
return (
    <div className="App" style={{ height: "95vh", width: "100%", display: "flex", justifyContent: "end", flexDirection: "column", alignItems: "center", padding: "20px" }}>
      <div style={{
        fontSize: "18px",
        fontWeight: "bold",
        marginBottom: "20px",
        height: "60vh",
        overflowY: "auto",
        padding: "10px",
        width: "80vw"
      }}>
        {displayValue.map((message, index) => (
          <div key={index} style={{
            display: "flex",
            justifyContent: message.isSelf ? "flex-end" : "flex-start",
            marginBottom: "10px",
            alignItems: message.isSelf ? "flex-end" : "flex-start"
          }}>
            <div style={{
              backgroundColor: message.isSelf ? "#DCF8C6" : "#F7F7F7",
              padding: "10px",
              borderRadius: "10px",
              maxWidth: "70%"
            }}>
              <span style={{ fontSize: "16px", fontWeight: "bold" }}>{message.sender}:</span>
              <br />
              <span>{message.text}</span>
            </div>
          </div>
        ))}
      </div>

      <div style={{ display: "flex", flexDirection: "row", alignItems: "center" }}>
        <input
          type="text"
          id="text"
          placeholder="Type a message..."
          value={inputValue}
          onChange={(e) => setInputValue(e.target.value)}
          style={{
            padding: "10px",
            fontSize: "18px",
            border: "1px solid #ccc",
            borderRadius: "10px",
            width: "1000px",
            marginRight: "10px"
          }}
        />
        <button
          onClick={handleSendMessage}
          style={{
            padding: "10px",
            fontSize: "18px",
            border: "none",
            borderRadius: "10px",
            backgroundColor: "#4CAF50",
            color: "white",
            cursor: "pointer"
          }}
        >
          Send
        </button>
      </div>
    </div>
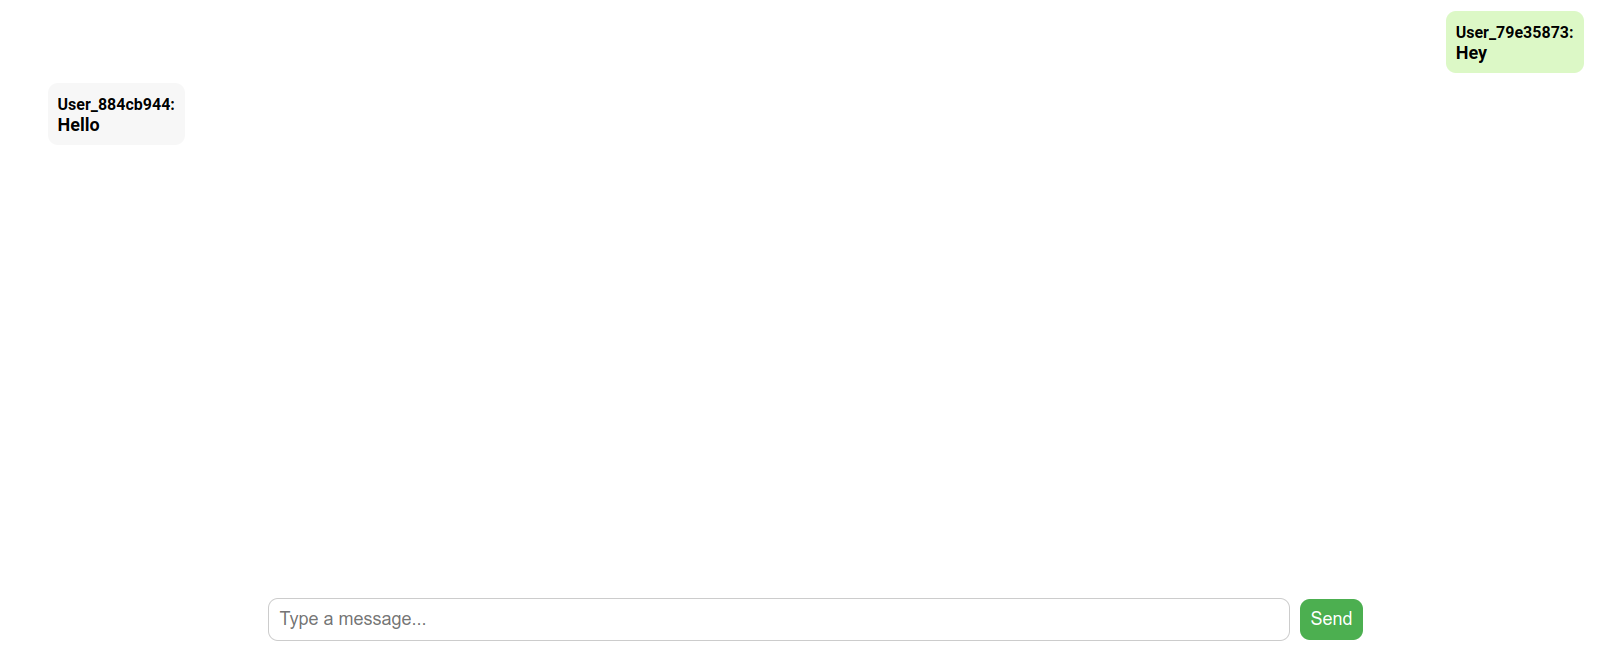
The entire return block defines the visual structure of your chat application.
At the top level, there is a main container div with the class "App". This container controls the full layout of the chat interface.
Main Container Styling
This container uses Flexbox and viewport units to control positioning:
- Height: 95vh This makes the container take up 95% of the viewport height. It ensures the app nearly fills the screen vertically.
- Width: 100% The container stretches across the full width of the screen.
- Display: flex Enables Flexbox layout, allowing flexible alignment of child elements.
- Flex Direction: column This stacks elements vertically from top to bottom.
- Justify Content: end This pushes content toward the bottom of the container. That’s why the input section stays near the bottom like a real chat app.
- Align Items: center This centers content horizontally.
- Padding: 20px Adds spacing inside the container so content isn’t glued to the edges.
Overall, this structure mimics the layout of messaging apps where messages appear above and the input area stays at the bottom.
Message Display Container
Inside the main container, there is another div that displays chat messages.
This is the scrollable message area.
Styling Breakdown
- Font Size: 18px Sets readable text size.
- Font Weight: bold Makes text slightly heavier for clarity.
- Margin Bottom: 20px Adds spacing between the message container and the input section.
- Height: 60vh The message area takes 60% of the viewport height.
- Overflow Y: auto Enables vertical scrolling when messages exceed available space.
- Padding: 10px Adds internal spacing around the messages.
- Width: 80vw The container spans 80% of the viewport width, leaving some margin on both sides.
This creates a centered, scrollable chat window — similar to WhatsApp Web or Slack.
Rendering the Message List
Inside the message container, the displayValue state array is mapped to render each message.
Each message is wrapped inside a flex container.
Message Wrapper Behavior
Each message wrapper uses Flexbox to control alignment.
- Display: flex Enables flexible layout for each message row.
- Justify Content If the message was sent by the current user (isSelf is true), it aligns to the right. If it was sent by someone else, it aligns to the left.
This is what creates the classic chat bubble alignment.
- Margin Bottom: 10px Adds spacing between messages.
- Align Items Controls vertical alignment depending on whether the message is self or not.
Message Bubble Styling
Inside each wrapper is the message bubble itself.
This bubble contains:
- Sender name
- Message text
Bubble Styles
- Background Color If the message is from the current user, it uses a light green color. If from others, it uses a light gray color.
This visual distinction improves readability and user experience.
- Padding: 10px Creates space inside the bubble.
- Border Radius: 10px Rounds the corners to create a soft chat bubble appearance.
- Max Width: 70% Prevents long messages from stretching across the entire screen. This improves readability and keeps the layout clean.
This entire design follows standard messaging UI principles.
Input Field and Send Button Section
At the bottom, there is a row containing:
- A text input
- A send button
This section also uses Flexbox to arrange elements horizontally.
Input Field Styling
The input field is a controlled component, meaning its value comes from React state.
Styling includes:
- Padding: 10px Makes typing comfortable.
- Font Size: 18px Matches message font size.
- Border: 1px solid #ccc Adds a light gray border.
- Border Radius: 10px Gives rounded edges.
- Width: 1000px Sets a fixed width (though this is not responsive).
- Margin Right: 10px Adds spacing between the input and button.
The field updates the inputValue state on every keystroke.
Send Button Styling
The button triggers the handleSendMessage function.
Styling includes:
- Padding: 10px
- Font Size: 18px
- Border: none
- Border Radius: 10px
- Background Color: Green
- Text Color: White
- Cursor: pointer
The pointer cursor improves UX by signaling that it is clickable.
Overall UI Behavior
Putting it all together:
- Messages appear in a scrollable area.
- Self messages align right and appear green.
- Other messages align left and appear gray.
- Input stays at the bottom.
- Messages update dynamically when state changes.
This is a clean, minimal chat interface using inline styling and Flexbox.
Removing React.StrictMode from index.js
Now let’s talk about the last instruction:
Go to index.js and remove React.StrictMode.
In development mode, React.StrictMode intentionally runs certain lifecycle methods twice.
This includes:
- useEffect
- Component mounting logic
Why?
To help developers detect side effects and unsafe patterns.
But in real-time apps (like WebSocket connections), this can cause:
- Double connections
- Duplicate subscriptions
- Multiple listeners being registered
If your useEffect opens a WebSocket connection and StrictMode runs it twice, you might see duplicated messages or unexpected behavior during development.
Removing React.StrictMode prevents that double invocation behavior.
Important:
- StrictMode only affects development.
- It does not affect production builds.
So removing it can make debugging WebSocket apps simpler during development.
Summary
This JSX structure:
- Builds a clean chat UI using Flexbox
- Displays messages dynamically
- Aligns messages based on sender
- Uses controlled inputs for message typing
- Handles real-time message updates through state
Removing React.StrictMode helps prevent duplicate WebSocket connections during development by stopping React from intentionally running effects twice.
This is the complete code for the app There is not much more to this, this is what makes up the whole application.
import PieSocket from 'piesocket-js';
import { useState, useEffect } from 'react';
import { v4 as uuidv4 } from 'uuid';

function App() {
  const [inputValue, setInputValue] = useState('');
  const [displayValue, setDisplayValue] = useState([]);
  const [channel, setChannel] = useState(null);
  const [username, setUsername] = useState(`User_${uuidv4().slice(0, 8)}`);

  useEffect(() => {
    const pieSocket = new PieSocket({
       clusterId: "Your Clouster ID",
      apiKey: "Your api key",
      notifySelf: true
    });
    pieSocket.subscribe("chat-room").then((channel) => {
      console.log("Channel is ready")
      setChannel(channel);
      channel.listen("new_message", (data, meta) => {
        console.log("New message: ", data);
        const message = {
          text: data.message,
          sender: data.sender,
          isSelf: data.sender === username
        };
        setDisplayValue((prevDisplayValue) => [...prevDisplayValue, message]);
      });
    });
  }, []);

  const handleSendMessage = () => {
    if (!channel) return;
    channel.publish("new_message", {
      message: inputValue,
      sender: username
    });
    setInputValue('');
  };

  return (
    <div className="App" style={{ height: "95vh", width: "100%", display: "flex", justifyContent: "end", flexDirection: "column", alignItems: "center", padding: "20px" }}>
      <div style={{
        fontSize: "18px",
        fontWeight: "bold",
        marginBottom: "20px",
        height: "60vh",
        overflowY: "auto",
        padding: "10px",
        width: "80vw"
      }}>
        {displayValue.map((message, index) => (
          <div key={index} style={{
            display: "flex",
            justifyContent: message.isSelf ? "flex-end" : "flex-start",
            marginBottom: "10px",
            alignItems: message.isSelf ? "flex-end" : "flex-start"
          }}>
            <div style={{
              backgroundColor: message.isSelf ? "#DCF8C6" : "#F7F7F7",
              padding: "10px",
              borderRadius: "10px",
              maxWidth: "70%"
            }}>
              <span style={{ fontSize: "16px", fontWeight: "bold" }}>{message.sender}:</span>
              <br />
              <span>{message.text}</span>
            </div>
          </div>
        ))}
      </div>

      <div style={{ display: "flex", flexDirection: "row", alignItems: "center" }}>
        <input
          type="text"
          id="text"
          placeholder="Type a message..."
          value={inputValue}
          onChange={(e) => setInputValue(e.target.value)}
          style={{
            padding: "10px",
            fontSize: "18px",
            border: "1px solid #ccc",
            borderRadius: "10px",
            width: "1000px",
            marginRight: "10px"
          }}
        />
        <button
          onClick={handleSendMessage}
          style={{
            padding: "10px",
            fontSize: "18px",
            border: "none",
            borderRadius: "10px",
            backgroundColor: "#4CAF50",
            color: "white",
            cursor: "pointer"
          }}
        >
          Send
        </button>
      </div>
    </div>
  );
}

export default App;
Just run the following command in terminal to start the app:
npm run start
Complete Code
The project is available on our GitHub : https://github.com/piehostHQ/react-ws-chat