
Rabikant
Nov 23, 2024
Getting Started with WebSocket in JavaScript
Lets learn how to use WebSoclets in JavaScript while making a chatapp
What is Websocket?
WebSockets represent a technology enabling real time interaction, between a web browser and both the client (often another web browser) and the server. In contrast to HTTP requests that're one directional and demand client initiation for each request WebSockets facilitate ongoing bidirectional communication, between the client and server.
<!DOCTYPE html>
<html lang="en">
<head>
<meta charset="UTF-8">
<meta name="viewport" content="width=device-width, initial-scale=1.0">
<title>PieSocket Tester</title>
<style>
/* CSS styles */
</style>
</head>
<body>
<!-- Body content -->
</body>
</html>
HTML Document Structure
The code begins with the Document Type Declaration () which's essential, for specifying the document as an HTML5 document. This declaration aids the browser in recognizing that the document adheres to HTML5 standards.
<!DOCTYPE html>
<html lang="en">
The tag comes after the declaration, in the HTML document indicating that the language used is English, with the lang="en" attribute.
Head Section
The section of an HTML page contains details, about the document that's n't visible on the web page but is essential, for its functionality and comprehension.
<head>
<meta charset="UTF-8">
<meta name="viewport" content="width=device-width, initial-scale=1.0">
<title>PieSocket Tester</title>
<style>
/* CSS styles */
</style>
</head>
tag tells the browser to put content in UTF - 8, which helps display text properly with a wide range of characters and symbols. is using to setting layout on mobile browsers. It notifies the browser that the viewport is being scaled to match a device-width: this scaleability option can be updated, configurable or disabled web design. PieSocket Tester tag named the title of the web page and is shown on top bar above browser tab which help user to orientate this page that belongs where.
Script Tag and PieSocket Library
<script src="https://unpkg.com/piesocket-js@3"></script>
This script tag imports the PieSocket JavaScript library from the CDN. PieSocket is a real-time networking platform that allows us to create conversational applications.
HTML Elements
<div id="chatLog"></div>
<div id="chatFormContainer">
<form id="chatForm">
<input id="chatMessage" placeholder="Type autocomplete="off"  message and press enter..." type="text">
</form>
    </div>
The code provided is the code that contains elements in HTML and relevant CSS tricks to work together offering you somewhat well-designed and responsive dialog view. In this presentation, we will go on to see the way HTML structure can integrate with properties in CSS - and how a good structure improves functionality.
HTML Structure
There are two main parts of HTML code: Dialog record store and dialog form store.
Chat Log Container
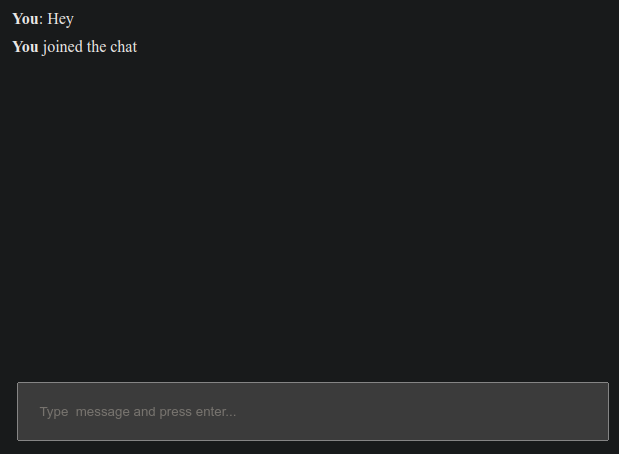
<div id="chatLog"></div>
The "chatLog" element serves as a tool, for showcasing chat messages. As messages are transmitted they are seamlessly integrated into this section enabling users to track the conversations timeline. The id attribute specifically distinguishes this element simplifying its presentation and handling through JavaScript.
Chat Form Container
<div id="chatFormContainer">
    <form id="chatForm">
        <input id="chatMessage" placeholder="Type a message and press enter..." type="text">
    </form>
</div>
The chat form container includes:
The chat form resides in the outer with id=”chatFormContainer”. This div is used to style and correctly position the div that contains the input areas for the start of a new chat.
While other items within this div are also present there is a
tag with id=”chatForm” . As discussed above, this form element is to address the interactive nature of chat messages and submitting the messages.
The input field within the form is named , with id=’chatMessage’, where typed messages are entered. A placeholder attribute informs the users what to do (i.e., to type a message and press enter).
CSS Styles Integration
The CSS styles provided earlier enhance the layout and appearance of the chat interface.
General div Styles
div {
    margin: 10px;
}
This rule adds a margin of 10 pixels around all div elements, ensuring they are spaced out from other elements on the page, creating a clean and organized look.
#chatFormContainer Styles
 #chatFormContainer {
            text-align: center;
            position: fixed;
            bottom: 5px;
            left: 5px;
            right: 5px;
        }
They make the chat form container stick at the bottom of the viewport and take almost the entire width of the viewport. The text-align: center; this stag ensures that the content is centered in the container hence making it easier for the user.
#chatFormContainer input Styles
#chatFormContainer input {
    display: inline-block;
    width: 90%;
    padding: 20px;
}
These rules style the input field within the chat form container:These rules style the input field within the chat form container:
display: inline-block; makes the input field respect the width/ padding while floating/inline in the document flow.
width: 90%; set this input field to take 90% of the container width, but with roughly 5-10% of extra space left around it for user friendliness.
padding: 20px; it bring space within the input box to give a better look and feel on the input bar for the messages from the users.
 var username = "user_"+(Math.floor(Math.random() * 1000));
        var chatLog = document.getElementById('chatLog');
        var chatForm = document.getElementById('chatForm');
        chatForm.addEventListener("submit", sendMessage);
The given piece of code in JavaScript aims at providing the fundamental features of a basic chat application developed with HTML and CSS. This shall provide a line by line analysis of how each of these codes works and how they fit into the general scheme of the chat application.
Username Generation
var username = "user_" + (Math.floor(Math.random() * 1000));
This line of code creates a username for the user as a string of 6 random letters. Here's how it works:
Math. random() produces a decimal number with values ranging from 0, including it, to 1, excluding it.
Math. random() * 1000 makes this number more extensive, and the number could be any from zero to 999.
Math. floor() function reduces the numerical value and brings the value closer to the actual integer more than the ceil() function.
The result obtained is appended with the string “user_” to get the format of the username such as “user_123”. This means that whenever a user opens the chat interface, he or she receives a unique number.
Getting HTML Elements
var chatLog = document.getElementById('chatLog');
var chatForm = document.getElementById('chatForm');HTML Document Structure
These lines of code retrieve HTML elements by their IDs and store them in variables for easy reference:These lines of code retrieve HTML elements by their IDs and store them in variables for easy reference:
document. getElementById('chatLog') returns a div element with id of “chatLog” this element is used to display the messages exchanged during a chat session.
document. getElementById(‘chatForm’) is used to return the form element with id ‘chatForm’ it is a form that holds the chat input box and the send button to submit the messages.
Adding Event Listener
chatForm.addEventListener("submit", sendMessage);
This line of code attaches an event listener to the chat form:This line of code attaches an event listener to the chat form:
chatForm. ;addEventListener("submit", sendMessage): waits for the ‘submit’ event to occur on the chat form.
When the form is submitted (e. g., when a user presses Enter after typing a message), the sendMessage function is called.
PieSocket Configuration
Create an account on piehost.com after that you will be able to create a cluster there and get your api key and cluster id.
var piesocket = new PieSocket.default({
clusterId: "your-clusterId",
apiKey: "your-api",
notifySelf: true,
presence: true,
});
This code initializes a new PieSocket instance with the following configuration:
clusterId: The ID of the PieSocket cluster to connect to. apiKey: The API key for authentication. notifySelf: A flag to indicate whether to receive notifications for messages sent by the same user. presence: A flag to enable presence tracking (i.e., tracking who is online). Subscribing to a Channel
var channel;
piesocket.subscribe("chat-room").then(ch => {
channel = ch;
});
This code subscribes to a PieSocket channel named "chat-room". When the subscription is successful, the channel variable is set to the channel object, and the code inside the then block is executed.
Listening to Channel Events
channel.listen("system:member_joined", function(data){
if(data.member.user == username){
data.member.user = "<b>You</b>";
}
chatLog.insertAdjacentHTML('afterend', `<div> ${data.member.user} joined the chat<div>`);
channel.listen("new_message", function(data, meta){
if(data.sender == username){
data.sender = "<b>You</b>";
}
chatLog.insertAdjacentHTML('afterend', `<div> ${data.sender}: ${data.text} <div>`);
    });
});
The provided JavaScript code snippet adds real-time chat functionality to a chat interface by listening to events such as a member joining the chat and new messages being sent. This is achieved using a WebSocket-like service, where the channel.listen method is used to handle incoming events. Below, each part of the code is explained to understand how it integrates these real-time features.
Listening for Member Join Events
channel.listen("system:member_joined", function(data){
    if(data.member.user == username){
        data.member.user = "<b>You</b>";
    }
    chatLog.insertAdjacentHTML('afterend', `<div> ${data.member.user} joined the chat<div>`);
});
This section of the code listens for the event "system:member_joined", which is triggered when a new member joins the chat. The provided callback function is executed when this event occurs.
Explanation:
Check If the New Member Is the Current User:
if(data.member.user == username){ data.member.user = "<b>You</b>"; }- data.member.user contains the username of the member who joined.
- If the new member's username matches the current user's username (username), the data.member.user is set to You, emphasizing that the current user has joined.
Update Chat Log:
chatLog.insertAdjacentHTML('afterend', `<div> ${data.member.user} joined the chat<div>`);- This line adds a new div element after the chatLog element, displaying a message that the member has joined the chat.
- The insertAdjacentHTML('afterend', ...) method inserts the specified HTML code directly after the chatLog element in the DOM.
Listening for New Message Events
channel.listen("new_message", function(data, meta){
    if(data.sender == username){
        data.sender = "<b>You</b>";
    }
    chatLog.insertAdjacentHTML('afterend', `<div> ${data.sender}: ${data.text} <div>`);
});
This section of the code listens for the event "new_message", which is triggered when a new message is sent in the chat. The provided callback function handles the display of the new message.
Explanation:
Check If the Sender Is the Current User:
if(data.sender == username){ data.sender = "<b>You</b>"; }- data.sender contains the username of the message sender.
- If the sender's username matches the current user's username (username), the data.sender is set to You, indicating that the message was sent by the current user.
Update Chat Log:
chatLog.insertAdjacentHTML('afterend', `<div> ${data.sender}: ${data.text} <div>`);- This line adds a new div element after the chatLog element, displaying the new message.
- The message is formatted to show the sender's username (or "You" if it's the current user) followed by the message text.
Sending a Message
function sendMessage(e) {
e.preventDefault();
if(!channel){
    alert("Channel is not connected yet, wait a sec");
    return;
}

var message = document.getElementById('chatMessage').value;

channel.publish("new_message", {
    sender: username,
    text: message
});
}
The sendMessage function is designed to handle the sending of messages in a real-time chat application. It prevents the default form submission behavior, checks if the channel is connected, and publishes the message to the chat channel. This explanation will break down each part of the function to detail its purpose and functionality.
Function Definition
function sendMessage(e) {
This line defines the sendMessage function, which takes an event object e as a parameter. This event object is used to prevent the default form submission behavior.
Prevent Default Form Submission
e.preventDefault();
This method prevents the default action associated with the event. In this case, it stops the form from submitting and reloading the page. This is crucial for single-page applications (SPAs) where page reloads are undesirable.
Check Channel Connection
if(!channel){
    alert("Channel is not connected yet, wait a sec");
    return;
}
This block of code checks if the channel object is defined and connected:
- if(!channel) evaluates to true if the channel is null or undefined, indicating that the connection to the WebSocket channel is not established.
- If the channel is not connected, an alert message is displayed to the user, informing them to wait.
- The return statement exits the function early, preventing the execution of the remaining code if the channel is not connected.
Retrieve Message from Input Field
var message = document.getElementById('chatMessage').value;
This line retrieves the value of the input field with the id="chatMessage". This value represents the message typed by the user:
- document.getElementById('chatMessage') gets the input element.
- .value extracts the text entered by the user into the input field.
Publish the Message
channel.publish("new_message", {
    sender: username,
    text: message
});
This block publishes the message to the WebSocket channel:
- channel.publish("new_message", {...}) sends a message to the channel with the event name "new_message".
- The message data is an object containing:
- sender: username: The username of the sender (the current user).
- text: message: The text of the message entered by the user.
This is the whole code for the app:
<!DOCTYPE html>
<html lang="en">
<head>
    <meta charset="UTF-8">
    <meta name="viewport" content="width=device-width, initial-scale=1.0">
    <title>PieSocket Tester</title>
    <style>
        div{
            margin:10px;
        }
        #chatFormContainer {
            text-align: center;
            position: fixed;
            bottom: 5px;
            left: 5px;
            right: 5px;
        }

        #chatFormContainer input {
            display: inline-block;
            width: 90%;
            padding: 20px;
        }
    </style>
    <script src="https://unpkg.com/piesocket-js@3"></script>
</head>
<body>
    <div id="chatLog">

    </div>
    <div id="chatFormContainer">
        <form id="chatForm">
            <input id="chatMessage" placeholder="Type  message and press enter..." type="text">
        </form>
    </div>
    <script>
        var username = "user_"+(Math.floor(Math.random() * 1000));
        var chatLog = document.getElementById('chatLog');
        var chatForm = document.getElementById('chatForm');
        chatForm.addEventListener("submit", sendMessage);

        var piesocket = new PieSocket({
            clusterId: "YOUR CLUSTER ID",
            apiKey: "YOUR API KEY",
            notifySelf: true,
            presence: true,
            userId: username
        });

        var channel;
        piesocket.subscribe("chat-room").then( ch => {
            channel = ch;

            channel.listen("system:member_joined", function(data){
                if(data.member.user == username){
                    data.member.user = "<b>You</b>";
                }

                chatLog.insertAdjacentHTML('afterend', `<div> ${data.member.user} joined the chat<div>`);
            })

            channel.listen("new_message", function(data, meta){
                if(data.sender == username){
                    data.sender = "<b>You</b>";
                }

                chatLog.insertAdjacentHTML('afterend', `<div> ${data.sender}: ${data.text} <div>`);
            })

        });

        function sendMessage(e) {
            e.preventDefault();

            if(!channel){
                alert("Channel is not connected yet, wait a sec");
                return;
            }

            var message = document.getElementById('chatMessage').value;

            channel.publish("new_message", {
                sender: username,
                text: message
            });
        }
    </script>
</body>
</html>
Complete Code
The project is available on our GitHub : https://github.com/piehostHQ/js-websocket