

Building a Cron Expression Parser and Scheduler
Lets Building a Cron Expression Parser and Scheduler
Rabikant
Mar 9, 2026
Cron jobs are used on a regular basis in software development because of automation. From scheduling basic performs like backup, sending email, or data synchronization, cron expression is perfect for defining when a perform should occur. Here in this blog, I’ll construct a cron parser and a cron viewer to assist in researching cron schedules using frontend Vue.js and backend Node.js.
In this article, you will be shown the step by step explanation on the code and will also know as to how you can develop a cracker of a tool for cron jobs.
What We'll Build
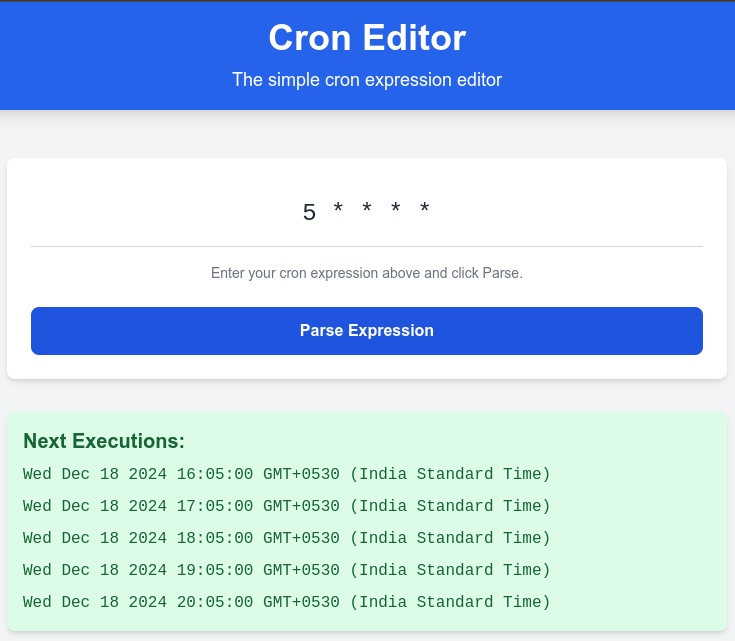
We are going to build a cron expression editor where one enters a cron expression similar to this * * * * * such expression will be parsed via a backend service and the next five scheduled execution times will be displayed. The project will consist of:
- Backend: It is a simple Node.js / Express API for parsing a cron expression and providing valid execution times.
- Frontend: A very simple Vue.js based UI where users can input cron expressions and view results in a UI.
Backend Code:
1. Initial Setup
const express = require("express");
const cors = require("cors");
const cronParser = require("cron-parser");

const app = express();
app.use(cors());
app.use(express.json());
Explanation:
- Dependencies:
- express: An absolutely minimalist Node.js framework for helping in the installation of HTTP APIs easily.
- cors: Enables Cross Origin Resource Sharing so that the frontend (running on different port) can interact with the backend without much limitation.
- cron-parser: Technically a cron library meant for parsing cron expressions and for deriving subsequent execution times .
- App Initialization:
- const app = express(): Creates application from the Express package.
- app.use(cors()): Permits requests from different origins (a must for development when frontend and backend are usually hosted separately).
- app.use(express.json()): Allows for analysis of information passed in the body in JSON format.
In this chunk we have, booted up the server and also set the middlewares that will enable the server handle the data received and cross origin resources sharing.
2. POST Endpoint: /parse-cron
app.post("/parse-cron", (req, res) => {
  const { cronExpression } = req.body;

  try {
    const interval = cronParser.parseExpression(cronExpression);
    const nextExecutions = [];

    for (let i = 0; i < 5; i++) {
      nextExecutions.push(interval.next().toString());
    }

    res.json({ message: "Valid cron expression", nextExecutions });
  } catch (error) {
    res.status(400).json({ error: "Invalid cron expression" });
  }
});
Explanation:
- Route Definition:
- app.post("/parse-cron", ...): Sets a POST route of /parse-cron to which the program will listen to incoming requests.
- Why POST?: The body of the request accepts a payload in the form of a cron expression that is why POST is used as the request method of the endpoint.
- Request Data:
- req.body: The first middleware express.json() is used to parse JSON payload from incoming requests.
- const { cronExpression } = req.body: Responsible for destructuring of cron expression from the request.
- Main Logic:
- cronParser.parseExpression(cronExpression): First, parses the incoming cron expression with the help of the ‘cron-parser’ library.
- interval.next(): Creates the next time the cron expression is going to execute. This is done 5 times in a loop to store the next 5 execution times of the procedure.
- nextExecutions.push(interval.next().toString()): Converts the execution time to the format that is easy to read and adds it to the nextExecutions array.
- Response:
If parsing succeeds:
{
  "message": "Valid cron expression",
  "nextExecutions": ["<time1>", "<time2>", "<time3>", "<time4>", "<time5>"]
}
If parsing fails:
{ "error": "Invalid cron expression" }res.status(400) ensures that an error response has an appropriate HTTP status code (400: Bad Request).
Error Handling:
- If the cron expression is invalid or cannot be parsed, the cron-parser library throws an error. The server catches this error using a try-catch block and responds with a clear error message.
This chunk handles the main backend logic for parsing cron expressions and generating output.
3. Starting the Server
const PORT = 3000;
app.listen(PORT, () => {
  console.log(`Backend running at <http://localhost>:${PORT}`);
});
Explanation:
- app.listen(PORT, callback): Starts the Express server at the specified port.
- PORT = 3000: The server is able to listen on port 3000.
- Console Log: Records a message when the server has successfully started making the identification of the running hospital server easier.
When you run the file using node server.js, you will see the following message in the terminal:
Backend running at <http://localhost:3000>
This chunk ensures the server is up and ready to handle incoming requests.
Testing the Server
To ensure the server works as expected, you can use tools like Postman, cURL, or even the browser (if testing GET endpoints).
Here’s how you can test this /parse-cron endpoint:
Test Data:
Send a POST request to http://localhost:3000/parse-cron with the following JSON body:
{
  "cronExpression": "*/5 * * * *"
}
Expected Response:
If the cron expression is valid, you’ll get:
{
  "message": "Valid cron expression",
  "nextExecutions": [
    "Mon, 01 Jan 2024 12:05:00 GMT",
    "Mon, 01 Jan 2024 12:10:00 GMT",
    "Mon, 01 Jan 2024 12:15:00 GMT",
    "Mon, 01 Jan 2024 12:20:00 GMT",
    "Mon, 01 Jan 2024 12:25:00 GMT"
  ]
}
If the cron expression is invalid, you’ll see:
{
  "error": "Invalid cron expression"
}
Edge Cases:
- Empty Body:
- Sending an empty body will result in an error because cronExpression will be undefined.
- Solution: Add a check on the backend to ensure cronExpression exists in the request.
- Invalid Cron Strings:
- Examples of invalid expressions include * ** * * * or random text like hello.
- These are gracefully handled by the try-catch block, ensuring the app doesn’t crash.
Why Use cron-parser?
The cron-parser library is a powerful tool that:
- Parses standard cron expressions (like * * * *).
- Supports generating multiple upcoming execution times.
- Handles errors gracefully if an invalid cron expression is provided.
This simplifies the backend logic since the library takes care of all the complexities.
Full Server Code Summary
Combining all the chunks, the full server code looks like this:
const express = require("express");
const cors = require("cors");
const cronParser = require("cron-parser");

const app = express();
app.use(cors());
app.use(express.json());

app.post("/parse-cron", (req, res) => {
  const { cronExpression } = req.body;

  try {
    const interval = cronParser.parseExpression(cronExpression);
    const nextExecutions = [];

    for (let i = 0; i < 5; i++) {
      nextExecutions.push(interval.next().toString());
    }

    res.json({ message: "Valid cron expression", nextExecutions });
  } catch (error) {
    res.status(400).json({ error: "Invalid cron expression" });
  }
});

const PORT = 3000;
app.listen(PORT, () => {
  console.log(`Backend running at <http://localhost>:${PORT}`);
});
In this server code breakdown:
- We set up the server using Express.
- We created a POST endpoint /parse-cron to accept cron expressions.
- We utilized the cron-parser library to generate execution times.
- We ensured proper error handling for invalid input.
Frontend Code:
1. Header Section
<header class="bg-blue-600 text-white py-4 text-center shadow-lg">
  <h1 class="text-4xl font-bold">Cron Editor</h1>
  <p class="text-lg mt-2 font-light">The simple cron expression editor</p>
</header>
Explanation:
- This is the header section of the app.
: Displays the main title Cron Editor with bold, large text.
- : A subtitle describing the tool.
- The classes from Tailwind CSS (bg-blue-600, text-white) give it a blue background, white text, and some padding and shadow for styling.
2. Input Area
<div class="w-full max-w-3xl px-6">
  <div class="bg-white shadow-md rounded-lg p-6">
    <input
      v-model="cronExpression"
      type="text"
      placeholder="* * * * *"
      class="w-full text-center text-2xl font-mono py-4 border-b border-gray-300 focus:outline-none focus:border-blue-500 transition"
    />
    <p class="text-center text-sm text-gray-500 mt-4">
      Enter your cron expression above and click Parse.
    </p>

    <button
      @click="parseCron"
      class="mt-6 w-full py-3 bg-blue-600 text-white rounded-lg font-semibold hover:bg-blue-700 transition"
    >
      Parse Expression
    </button>
  </div>
</div>
Explanation:
- :
- Uses v-model="cronExpression" to bind the input value to the cronExpression data property.
- Adds placeholder text to hint at the cron format (e.g., * * * *).
- :
- Has a click event (@click="parseCron") that triggers the parseCron method.
- Tailwind CSS styles like bg-blue-600 and hover:bg-blue-700 make the button visually appealing and interactive.
This chunk represents the input area where the user enters a cron expression.
3. Error Message Display
<div v-if="errorMessage" class="w-full max-w-3xl px-6 mt-8">
  <div class="bg-red-100 text-red-600 p-4 rounded-lg shadow-md">
    {{ errorMessage }}
  </div>
</div>
Explanation:
- The v-if="errorMessage" directive ensures this block is only shown if errorMessage is not empty.
- {{ errorMessage }} dynamically displays the error received from the backend.
- Tailwind classes give it a red background with padding and rounded corners for a clean look.
4. Next Executions Display
<div v-if="nextExecutions.length" class="w-full max-w-3xl px-6 mt-8">
  <div class="bg-green-100 text-green-800 p-4 rounded-lg shadow-md">
    <h2 class="text-xl font-semibold mb-2">Next Executions:</h2>
    <ul class="space-y-2">
      <li
        v-for="(execution, index) in nextExecutions"
        :key="index"
        class="font-mono"
      >
        {{ execution }}
      </li>
    </ul>
  </div>
</div>
Explanation:
- v-if="nextExecutions.length": This ensures the block is displayed only when nextExecutions contains values.
- v-for Loop:
- Loops through the nextExecutions array to display each execution time.
- The key attribute ensures Vue tracks the list items efficiently.
- Tailwind classes (bg-green-100, text-green-800) give it a visually distinct green success message.
How to Run the Project
- Backend:
- Save the backend code in server.js.
Run the following commands:
npm install express cors cron-parser
node server.js
The server will start at http://localhost:3000.
- Frontend:
- Save the Vue code in App.vue.
Ensure axios is installed:
npm install axiosRun the frontend using Vite:
npm run dev
- Open http://localhost:5173 in your browser to use the Cron Editor!
Complete Code
The project is available on our GitHub : https://github.com/piehostHQ/cronjob